What Makes Challah Different
Challah is an enriched bread. Eggs, oil, and a little sugar go into the dough, so the crumb bakes up soft and tender instead of lean and crusty, and the loaf stays fresh a day or two longer than a plain white bread would. Because it is traditionally made without dairy, oil takes the place of butter.
That richness has a cost: fat and sugar slow the yeast down. A challah dough needs a full first rise and a patient final proof, and it will not forgive being hurried with heat. The same method — mix, knead to a windowpane, rise slowly, braid gently — is the foundation for other soft enriched loaves such as brioche, so everything you learn here carries over.
New to braiding? Bake the three-strand version first. The crumb is exactly the same, and the shape is far easier to keep even.
The Ingredients
This makes one large braid, about 900 g of dough. If you would rather bake two smaller loaves, divide the dough in half after the first rise, shape two three-strand braids, and start checking them for doneness about five minutes earlier.
Ingredient | Amount | Why it is there |
|---|---|---|
Bread flour | 500 g (4 to 4¼ cups) | Higher protein holds up to the eggs and oil |
Lukewarm water | 120 g (½ cup) | Warm, not hot — hot water can kill the yeast |
Large eggs | 3, plus 1 yolk (about 170 g) | The yolk is what makes the crumb golden and tender |
Neutral oil or olive oil | 55 g (¼ cup) | Keeps the loaf pareve and soft |
Granulated sugar | 60 g (5 tablespoons), or 85 g (¼ cup) honey | Feeds the yeast and rounds out the flavor |
Fine salt | 10 g (1¾ teaspoons) | Bread without enough salt tastes flat |
Instant yeast | 7 g (2¼ teaspoons, one packet) | Or the same amount of active dry |
One note on measuring flour: spoon it into the cup and level it off, or weigh it. Scooping straight from the bag can pack in 20 percent more flour than you want, and that is the single most common reason a challah loaf comes out heavy.
You will also want a large mixing bowl, a stand mixer with a dough hook (or a clean counter and about ten minutes), a bench scraper, parchment paper, a rimmed baking sheet, a pastry brush, and a cooling rack.
Mix and Knead the Dough
Whisk the eggs, water, oil, and sugar (or honey) in a large bowl until the sugar dissolves. If you are using active dry yeast, sprinkle it into the lukewarm water first with a pinch of the sugar and let it sit for five to ten minutes until it looks foamy. Instant yeast can go straight into the flour.
Add the flour, then the yeast, then the salt, keeping the salt from landing directly on the yeast. Stir with a sturdy spoon until a shaggy dough forms, then turn it out and knead.
- By mixer: 6 to 8 minutes on medium-low with the dough hook, until the dough clears the sides of the bowl and looks smooth.
- By hand: 10 to 12 minutes, folding, pressing, and turning the dough until it stops feeling like a pile of parts.
The dough is ready when it is smooth, slightly tacky, and stretches thin enough to see light through it without tearing — the windowpane test. If it keeps tearing, give it a ten-minute rest and knead a little longer; the flour needs time to hydrate.
Resist adding flour. Challah dough looks sticky for the first few minutes and then tightens on its own. If it is genuinely unworkable, add flour one tablespoon at a time and stop after two or three.
Let It Rise Until It Doubles
Cover the bowl and leave the dough somewhere draft-free at about 75 to 78°F (24 to 26°C) for 1½ to 2 hours, until it has nearly doubled and the top looks domed and a little puffy. A cold kitchen can push this to three hours; a turned-off oven with the light on is a reliable warm spot that most kitchens already have.
To check the rise, press two fingers gently into the dough. If the dent springs back slowly and only partway, it is ready. If it bounces back immediately, give it more time. If it does not spring back at all, the dough has gone too far — punch it down, shape it anyway, and expect a slightly denser loaf.
Divide, Pre-Shape, and Rest
Turn the dough onto a lightly floured counter and press it flat to knock out the big bubbles. Divide it into six equal pieces of about 150 g each for a six-strand braid, or three pieces for a three-strand braid.
Roll each piece into a tight ball by cupping your hand over it and circling the dough against the counter. Cover the balls and let them rest for 10 to 15 minutes. This short rest matters more than it sounds: it relaxes the gluten so the ropes roll out long and even instead of snapping back.
Roll the Ropes and Braid
Roll each ball into a rope about 14 to 16 inches long, working from the center outward and keeping the thickness even. Taper the ends slightly. Use only a whisper of flour — too much and the ropes will not grip each other, which is why braids slide apart in the oven.
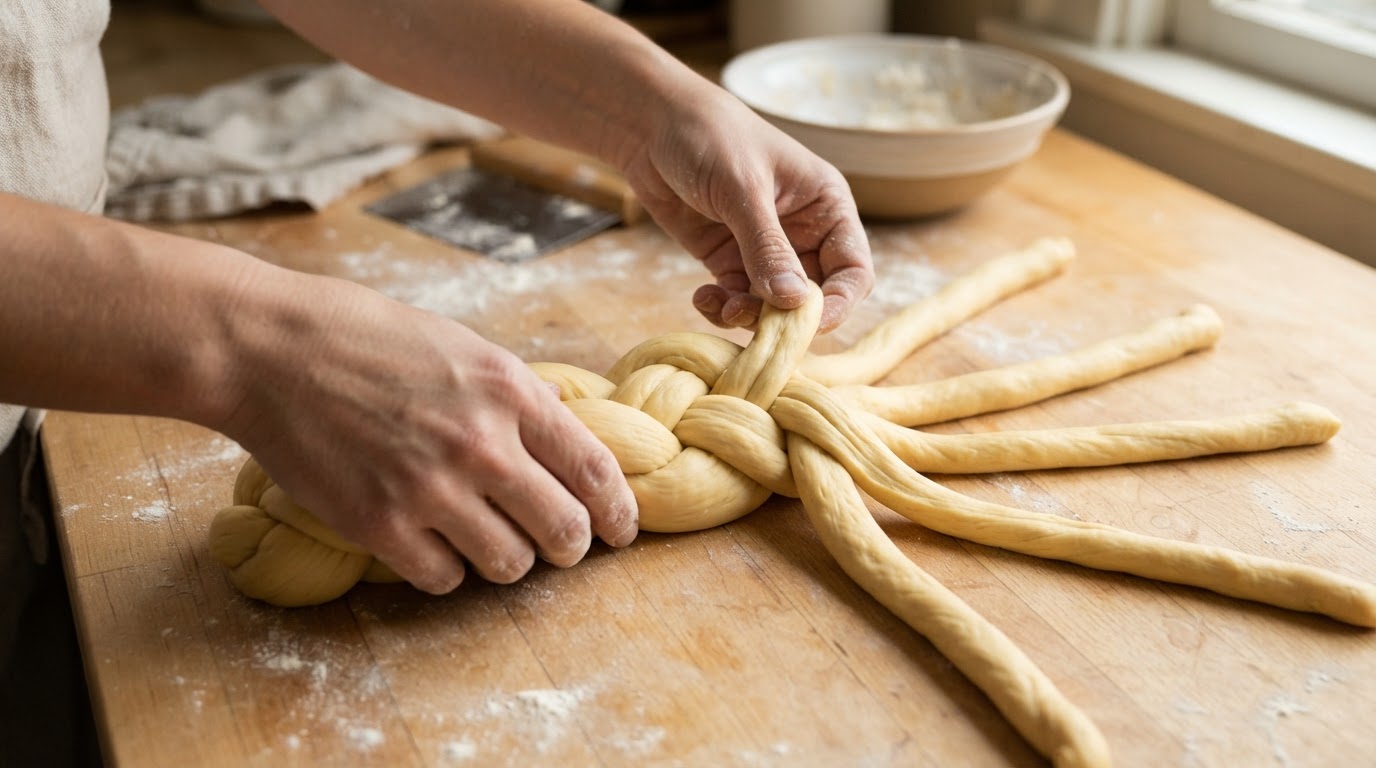
Three-strand braid. Pinch the three ropes together at one end. Cross the right rope over the middle one, then cross the left rope over the new middle one. Keep repeating — right over middle, left over middle — and gently push the braid upward as you go so the strands stay snug. Pinch the end and tuck both ends underneath.
Six-strand braid. Six ropes make the wide, classic challah plait. Pinch the ropes together at the top and fan them out flat. Working the outside rope toward the center, weave it over and under the ropes beside it, then do the same from the other side, alternating sides until you reach the end. The rhythm matters more than speed: even crossings, relaxed tension. A braid pulled tight will burst open along the seams as the dough springs in the oven.
Round challah. Roll the whole dough into one long rope, then coil it into a snail and tuck the tail underneath. It is the traditional shape for Rosh Hashanah and by far the most forgiving one to make.
Whichever shape you choose, pinch the seams and tuck the ends well under the loaf so they do not unfurl while it bakes. Move the shaped loaf onto a parchment-lined baking sheet.
Final Proof: The Step Most Bakers Rush
Let the braid rise uncovered at room temperature for 45 to 60 minutes, until it looks noticeably puffy and has grown by about half. Use the same poke test as before. If the loaf is slow, wait — the oven is far more forgiving of a well-proofed loaf than a rushed one.
Now is also the moment to preheat the oven to 350°F (175°C) with a rack in the lower middle, and to whisk the egg wash: one egg, one tablespoon of water, and a pinch of salt.
Egg Wash, Toppings, and Bake
Brush the proofed loaf with a thin, even coat of egg wash, reaching into the crevices but not letting the wash puddle there — puddles bake into shiny patches that can flake off. Scatter sesame seeds, poppy seeds, nigella, or everything seasoning over the top while the wash is still wet.
Bake for 32 to 38 minutes, rotating the pan at the 20-minute mark so the loaf browns evenly. If the braid is getting dark before the middle is done, lay a sheet of foil loosely over the top and keep baking. A large braid is done when the crust is a deep golden brown, the bottom sounds hollow when tapped, and the center reads 195 to 200°F (90 to 93°C) on an instant-read thermometer.
For a deeper gloss, brush a second light coat of egg wash about 15 minutes into the baking. Quick strokes, then close the oven door again right away.
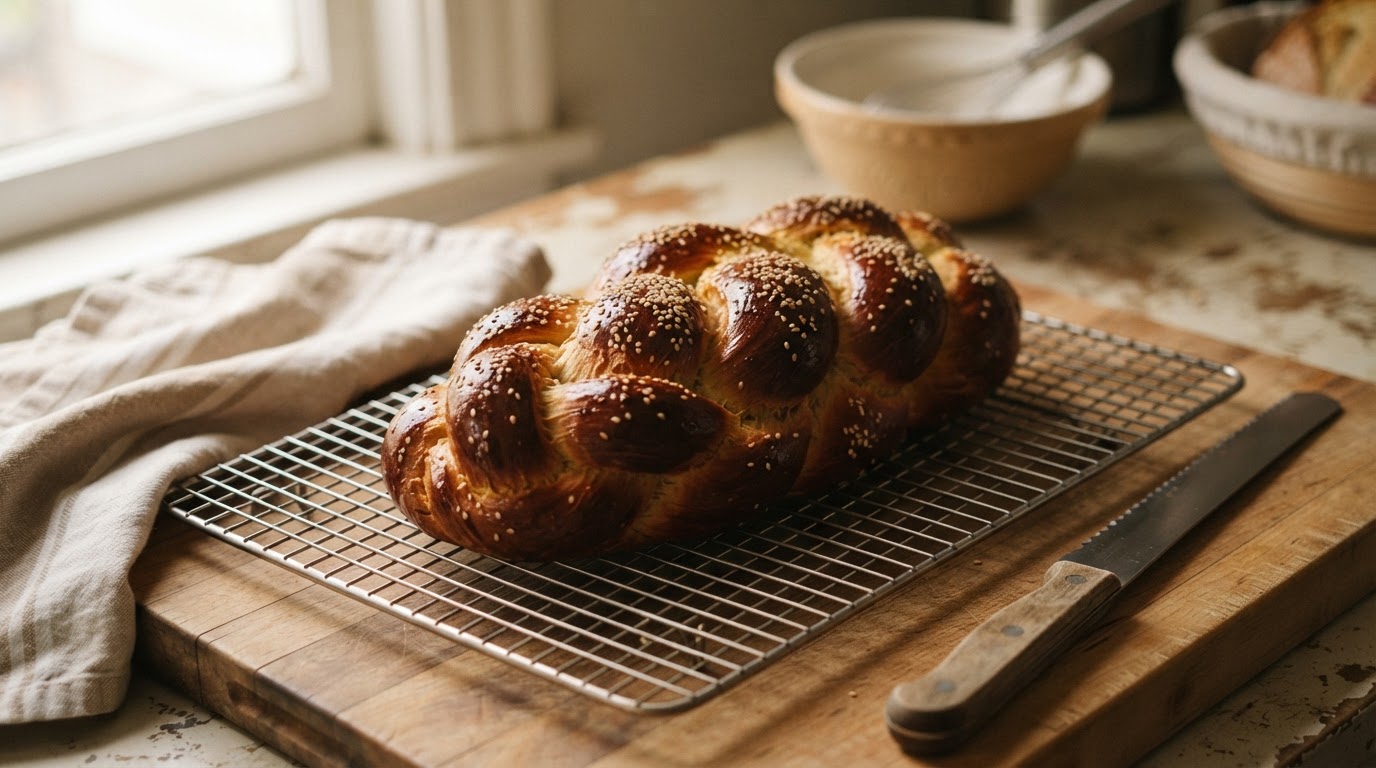
You are aiming for a loaf that is deep golden and glossy, with a soft, fine, lightly sweet crumb that pulls apart along the braid.
Cool Before You Cut
Slide the loaf onto a cooling rack and wait at least an hour. This is the hardest instruction in the recipe and also the one that decides the crumb: bread that is cut hot releases steam and turns gummy inside. The loaf also firms up as it cools, which makes it far easier to slice cleanly.
Same-Day or Overnight: Choose Your Schedule
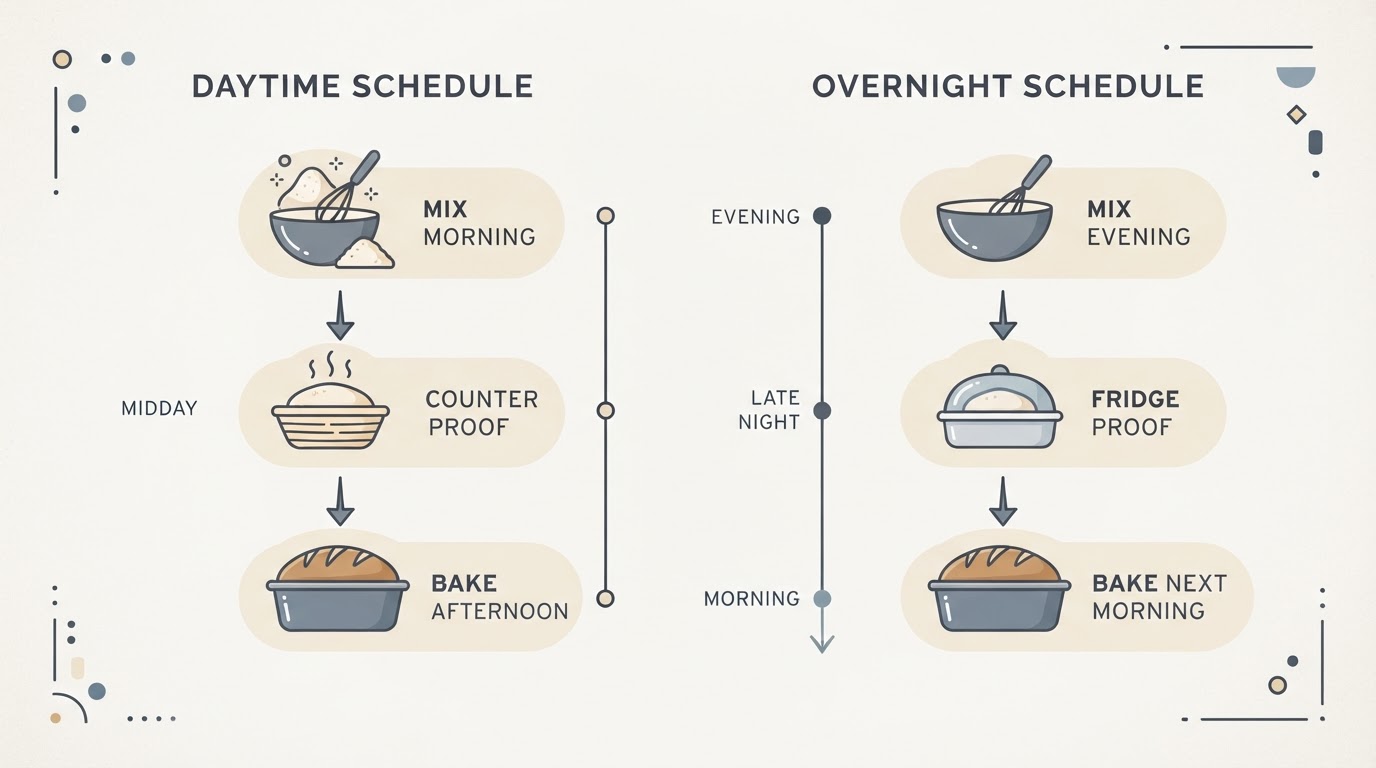
The recipe above is a same-day bake. Start in the morning, pull a braid out of the oven in the early afternoon, and you are looking at about four hours from flour to loaf. The flavor is mild and sweet, and the whole thing fits inside a normal weekend day.
If you want more flavor and a more flexible schedule, use the cold-retard version. Drop the yeast to 4 g (1¼ teaspoons), shape the braid, then cover it and let it proof in the refrigerator for 8 to 16 hours. The slow, cold rise builds a noticeably deeper, faintly tangy flavor. Take the loaf out while the oven preheats, brush it with egg wash, and bake it as usual, adding three to five minutes.
The trade-off is real in both directions. The overnight version needs fridge space and can over-proof if your refrigerator runs warm, while the same-day version gives you a faster answer and a milder, more classic challah flavor. Neither is better — they are just built for different mornings.
Troubleshooting
What went wrong | What caused it | What to do next time |
|---|---|---|
The dough barely rose | A cold kitchen, old yeast, or salt sitting directly on the yeast | Find a 75 to 80°F spot, proof active dry yeast first, and keep salt away from the yeast |
The loaf is dense and tight | Under-kneading, an incomplete first rise, or too much flour | Knead to the windowpane, let the dough truly double, and weigh the flour |
The braid split open in the oven | The braid was pulled too tight, or the dough was over-proofed | Braid with a relaxed hand and bake when the loaf is puffy, not exhausted |
The center is gummy | The loaf was underbaked, or it was sliced while hot | Bake to 195 to 200°F and cool for a full hour |
The crust is pale | The oven ran cool, or the wash and the bake were too short | Check the oven temperature, use the full bake time, and brush a second coat |
The top darkens before the middle cooks | The loaf is on a high rack, or the dough carries a lot of sugar | Tent it with foil and move the pan to a lower rack |
The egg wash flakes off | Too heavy a coat, or brushing over a layer that had already dried | Brush thin, even coats and always brush onto a wet surface |
The crumb is dry and tough | Too much flour, or overbaking | Measure the flour by weight and start checking at 30 minutes |
The flavor is flat | Not enough salt | Use the full 10 g; enriched dough needs salt to taste like anything |
If you take one thing from this list, make it the flour. A dough that was weighed, kneaded to the windowpane, and proofed slowly will forgive almost everything else.
Variations Worth Trying
- Honey challah. Swap the sugar for 85 g (¼ cup) of honey. The loaf picks up a deeper flavor, a slightly darker crust, and stays soft a little longer.
- Milk challah. Replace the water with the same weight of whole milk and skip the pareve rule. The crumb gets richer and softer, closer to brioche.
- Butter version. Melted butter in place of the oil gives a more delicate, buttery flavor. Keep this one dairy if that works for your table.
- Whole wheat. Replace up to a quarter of the bread flour with whole wheat flour and add a tablespoon or two of water, since whole wheat absorbs more.
- Sourdough challah. If you keep a starter, use about 100 g of active starter in place of the yeast and give the dough a much longer rise — 6 to 8 hours at room temperature or overnight in the fridge. The crumb comes out a little tangier and less sweet than the yeasted version.
Storing and Freezing
Challah is best the day it is baked, but it keeps well for two days wrapped in a paper bag or a clean kitchen towel, cut side down. A plastic bag will soften the crust, which some people prefer — it is a matter of whether you want crisp or soft.
For longer storage, wrap the whole loaf tightly, freeze it for up to three months, and reheat it at 350°F for 5 to 10 minutes. A light spritz of water before reheating brings some of the shine back.
And if there is any left after that, it makes excellent French toast.